What a bad blogger I’ve been in the last year. I started a post on November 6, 2022 (quoted below), but never finished it.
Moving to Ventura
It’s been two months since my last post, but who’s counting? In the meantime, autumn started in the northern hemisphere, my Mom had her 85th birthday, and I did not purchase any new Apple kit … yet. I did install the new operating system versions for iPhone, iPad, Watch, and TV when they became available. And this weekend, I moved to Ventura.
Vintage Ventura, California postcard.
No, not that Ventura, this Ventura.
The macOS Ventura title screen from WWDC 2022.
I installed macOS 13 Ventura on the two M1 Macs in our house. It has been the smoothest macOS upgrade in all my years of using a Macintosh computer. There have been some glitches and gotchas, but the process of upgrading couldn’t have been easier. It only took about an hour from the time I launched the installer until each Mac was up and running in Ventura. I have not tried all the new features yet, but I’ve got some time to learn all about them before the next version of macOS drops in the fall of 2023.
Now, Apple’s fall 2023 iPhone event has come and gone and the release of macOS 14 Sonoma is only nine days away. It looks like the first full weekend in October may be a window of opportunity to install it on at least my M1 Mac mini, since I do get a paid holiday on October 9.
So much has transpired in the last year. The tech sector alone has seen some transformative and disruptive advancements, especially in the area of generative “AI”, such as ChatGPT, Midjourney, and Adobe Firefly, to name just three. It seems like every company large and small is jumping on the “AI” bandwagon. I have tried some of them and found use cases in both writing and image generation that provide some time savings, inspiration, and solid starting points for my own creative efforts. And, I admit, they are rather fun.
But can we agree on one thing? These generative “AI” systems are not really artificial intelligence. There is no real intelligence, per se. There is no discernment or consciousness behind the curtain pulling the levers and spinning the dials that ultimately spit out the word or images in response to our prompts. These systems are algorithmic and rely on large data sets to predict the next word or construct the image. I would really like to see the initialization “AI” replaced with “LLM” (for large language models) or something similar. Will machines one day become sentient and self-aware like in so many of our science fiction musings? Who knows, perhaps. In the meantime, let’s save “AI” for use when that day actually comes.
In other news, the new iPhone 15 and 15 Pro models are available to order, as are the new Apple Watches Series 9 and Ultra 2. If you would like the watch the video from the September 12 “Wonderlust” event, you can find it on YouTube, on Apple’s website, and in the AppleTV app on any device that supports it.
That’s all for today as I have a regularly scheduled FaceTime call and some other items on my checklist for today before the day’s end. Hopefully, I will post again before this time next year.
It’s been a few months. I thought I’d start off 2022 by sharing a couple more tips. These short videos are from the January meeting of the Mountain View Computer Users Group. Enjoy!
Some of you may know (and now the rest of you will, too) that I’m one of two Vice Presidents serving the Mountain View Computer Users Group in Sierra Vista, Arizona. It’s a multi-platform group that focuses on personal computing topics for Windows, macOS, iOS, iPadOS, and Android users. It started as a Mac user group in the late ’80s, but that’s a story for someone else’s blog.
Anywho, we have recurring tips of the month segments at our meetings for Windows, macOS, and iOS. At our last meeting on October 9, I provided the tips for Macs and iPhones and I thought I’d share them here.
We are on the eve of another fall 2021 Apple event. Invitations went out last Tuesday, October 12. Are you ready for personal computing power to be “unleashed”? I didn’t get an invitation, but no one needs one because this event, just as the last seven, will have no live audience and be streamed free for anyone who cares to watch.
All the rumors, analysts, and pundits point to the next round of Apple silicon–powered Macs — this time the high-end MacBooks Pro. Perhaps a redesigned high-end Mac mini. Hopefully the larger iMac (30- or 32-inch screen?) with the new design language introduced with the 24-inch iMac.
Tune in tomorrow at 10:00 a.m. PDT (U.S.) and watch the live stream. You can watch it on Apple’s website, YouTube, or in the Apple TV app on any supported Apple device as well as many others (Amazon Fire TV and select smart televisions, for example).
I will be watching while working and then rewatch it again after I get home.
Or OSX, or macOS. It’s hard to believe that you are 20 years old. I’ve been using you and your predecessors longer than I used classic Macintosh systems starting with System 4.2 all the way through Mac OS 9 from 1987 through 2001. And now that you are starting your 21st year, you have turned 11 — macOS 11 (Big Sur), that is.
I’m starting a series of blog posts inspired by a Facebook post I made — and the subsequent comments — on June 21, 2020. That happened to be Father’s Day here in the U.S. I posted a photo of myself with my brother Mark and my father John wishing them both a happy Father’s Day. In the photo all three of us have new T-shirts draped over our chests that my mother Judy gave us. The solid black shirts have three simple words screen printed in white on the front: “I’m a Mac”. We were — and still are — Mac users and avid Apple fans.
The Midgorden “Macs”: from left to right; brother Mark, father John, and Barry (me). Taken June 25, 2007.
A Facebook friend commented, “Curious, what does ‘Mac’ mean?”
I replied: “Mac is short for Macintosh, as in Apple’s personal computer. ‘I’m a Mac’ is in reference to the series of Get a Mac TV commercials featuring John Hodgman as a PC and Justin Long as a Mac that ran from 2006 to 2009.”
What follows is the rest of my reply, added to and edited for this first installment of “My Mac Story”.
The Beginning
My Mac story starts in the fall of 1984. My wife and I were living in Portland, Oregon at the time. We had traveled to my parents’ home in Fremont, California for Thanksgiving. My aunt Ruth (my dad’s sister) and uncle A.J. from Fountain Valley, California (in Orange County near L.A.) were also there.
My uncle was an engineer and computer programer for McDonald Douglas. He had an original Macintosh 128 and was leaning how to write software for it.
The original Macintosh 128
He brought it with him to show my dad, but I was also entranced. I spent hours over the holiday weekend playing with MacPaint and eventually recreated a logo I had recently designed for JJC Ministries* in tiny black and white pixels on the 9-inch (512 x 342) monochrome display.
A printed, vector-based version of the JJC Ministries logo.
The Macintosh obviously made an impression on me. But it was way out of my price range at the time and the professional graphic art environment in which I worked was still fully analog — drafting tables, Rapidographs, rubylith, and dark room with a process camera, photo chemicals, and hand-set typography equipment.
I didn’t think much about computer graphics at all until I was sent on a business trip to a 3M-sponsored design conference in Redondo Beach, California in 1986. One of our field trips was to the ArtCenter College of Design in Pasadena. There we got to sit and play in a computer lab for exploring early digital design tools. It was equipped with Apple IIGS computers running what was essentially a color version of MacPaint. It was fun, but I did not come away from that experience nearly as captivated as I was with my uncle’s Macintosh.
I didn’t have too long to wait until I got to use a Mac again, however. In the summer of 1987, my employer at the time, Gillespie Decals, Inc., purchased Macintosh SEs for the production art department.
The Macintosh SE
It was a two-floppy diskette model and we used System 4.2 initially with MacDraw software to create small, simple label art, printed it out on a 300dpi LaserWriter, then took the black and white output to the darkroom process camera to create the transparencies needed for the printing processes being used in the plant (screen, flex, and/or hot stamp). Later that year we added external SCSI 40 MB (that’s megabytes) hard drives and the first version of Adobe Illustrator, which was an amazing leap from MacDraw for vector graphics.
Later that year I took out a personal loan and bought the identical model for home and “I’m a Mac” ever since.
There’s more to come, so stay tuned to this blog for more installments of “My Mac Story”.
* “JJC” stands for Jesus, Joy, and Clowns. In a former life I was involved with the Christian clowning movement, but that’s a topic for a completely different blog.
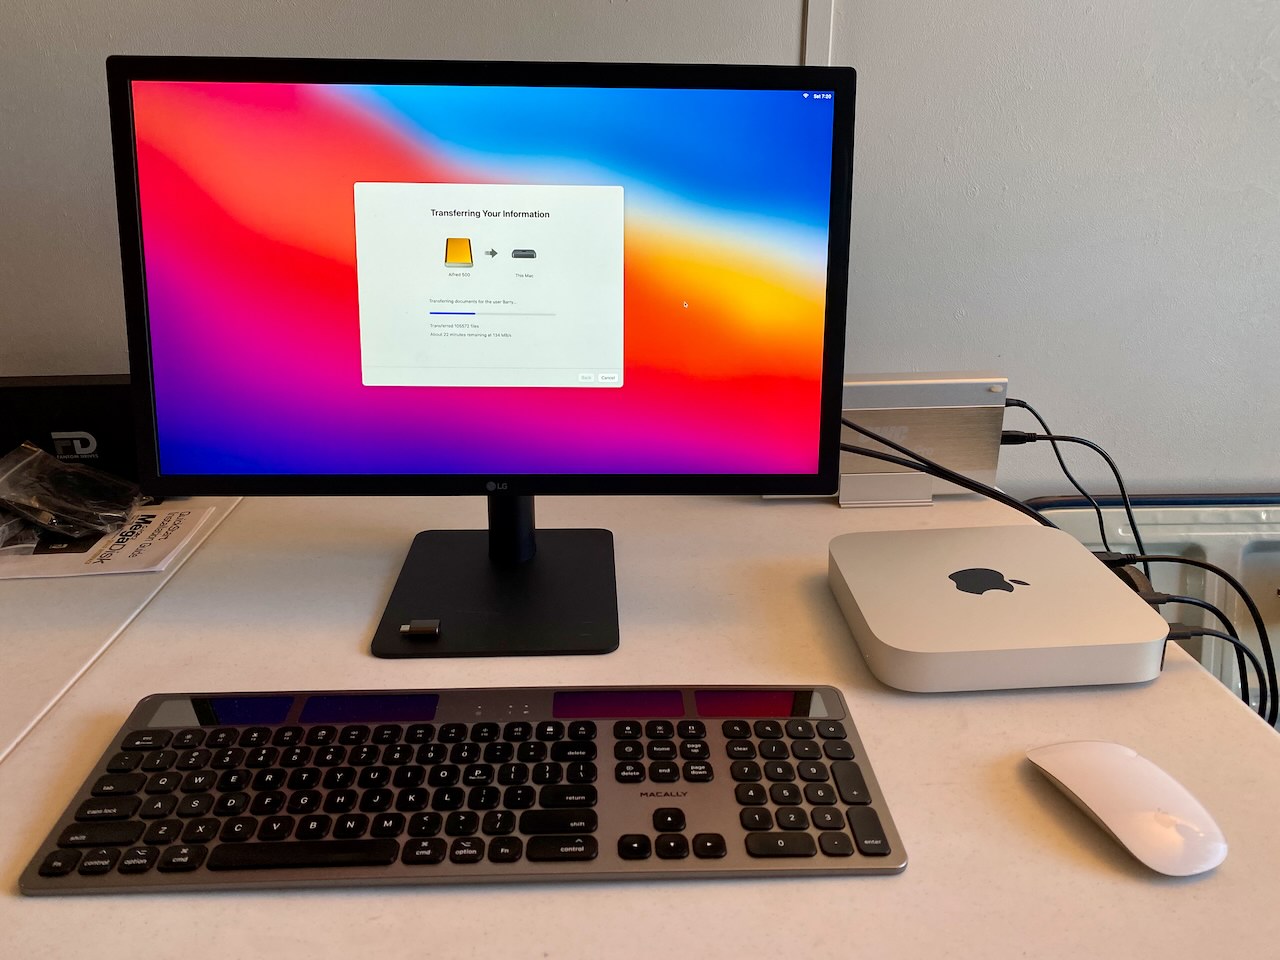
For the second time in as many months I did something I’ve never done before; placed an order for a new Apple product right after the keynote event where it was announced. As previously blogged, I ordered a new Apple Watch Series 6 after the Time Flies event in September. Last month I ordered a new Apple Silicon M1 Mac mini to replace my aging iMac (21.5-inch, Mid 2011).
The Back Story
The iMac was a gift from my cousin Ann. It had belonged to my Uncle A.J., who passed in April of 2015. I kept it updated up to the latest operating system it could run (macOS 10.13 High Sierra). I’m sure I also stressed it much more than my uncle ever did with lots of menu bar utilities and Adobe Creative Cloud software. It was a work truck, but showing its age. Some iCloud services were no longer syncing reliably, partly because of the age of the OS. It was slow and prone to spinning beachballs. I couldn’t upgrade to the 2021 versions of the Adobe creative software apps as they didn’t run on High Sierra. And most disturbingly, it appeared that the graphics system was going out. The displays, both the built in and a connected Apple Cinema Display HD, would spontaneously flash little multicolored checkerboards at random intervals and areas across the screen. I knew I needed a new Mac sooner than later, but because of Apple’s June WWDC announcement of new Macs based on their own silicon design coming before year’s end, I wanted to wait until the announcement to see if one of the new systems would fit my needs and budget. I was hoping for an iMac or a Mac mini. My wait was rewarded and shortly after Apple’s One More Thing event on November 10, I ordered the M1 Mac mini.
My First Mac mini
This is the first time I’ve purchased a new Mac that didn’t have a built in display or come with a keyboard and mouse. Because of that, it’s also the least expensive Mac I’ve ever bought. Every Mac I’ve purchased since 1987 through 2018 (there have been five) were all on the high side of $2K. Since I did have a keyboard, mouse, and display, the Mac mini was the perfect fit and I could afford to bump up the specs and spend less than $1,500.
The New Setup
The new M1 Mac mini setup.
My new M1 Mac mini has 16 GB of memory and 1 TB of storage.
The monitor on the left is an LG UltraFine 4K display (21.5-inch). This monitor was a gift from my father a few months ago. He used it as an external display for a 2017 MacBook Pro (the first generation with a Touch Bar), that he eventually sold and replaced with a 27-inch iMac. It had been in his basement, so he generously sent it to me for an external monitor for our 2018 MacBook Air so I would at least have a backup machine in case the old iMac went completely kaput before I could replace it.
Since I was used to a two-monitor setup, I knew I would want another display. On the recommendation of Dave Hamilton and John F. Braun of the Mac Geek Gab podcast, I purchased the Monoprice 27-inch CrystalPro UHD 4K monitor (on the right). Even though Apple worked directly with LG to produce the UltraFine displays back when Apple stopped making and selling their own, out of the box the Monoprice display seems, to my eye, to have a more accurate white point. The LG display looks to have a bit of a blue cast in comparison. I have not done any calibration on either yet — one of many things on the list for refining the new setup.
Western Digital MyBook 1 TB hard drive (file archives)
Western Digital MyPassport 1 TB hard drive (file archives clone)
Epson Perfection 4490 Photo flatbed scanner (I have not yet tested this with the new Mac and Big Sur — the software from Epson is not compatible, so I have to find an alternative.)
Wacom Graphire graphics tablet (from 2004 — it still works as an input device, even without specific drivers, and I can draw with it, but the pressure sensitivity is no longer recognized by any software I have tried lately.)
Apple Magic Mouse (generation 1 — the one with replaceable AA batteries)
Altec Lansing stereo computer speakers (I’ve had these for years)
That’s how it stands for now. As mentioned, there is a list of things to do and things to purchase as time goes on, but for now I can be productive with this initial setup.
Week One Impressions
During the initial setup my main first impression was, “Wow, this Mac is snappy!” That word has been thrown around a lot in many reviews of the new M1 Macs I’ve read. Even to the point of being perceived as hyperbole. It’s not a bad adjective for the experience, but one could also say “this Mac flies” or “it’s wicked fast”. Granted, I’m coming from an overburdened, nine-year-old iMac. But even our two-year-old MacBook Air is not as “snappy” as this new Mac mini. Apple has done something extraordinary in computing with their own systems on a chip (SoC). They have created a computer that is quiet, efficient, cool, and fast. Usually there are tradeoffs among those characteristics, but not with the M1.
System Setup
Instead of setting this up as a brand new machine, letting my cloud documents sync down and reinstalling all my apps, etc., I chose to migrate the system over from the iMac and see if I could get up and running faster. Actually I used a clone of the system on an external hard drive for it’s ease of implementation.
Usually, migrating a previous system to a new Mac is a processor-intensive, fan-spinning, slow process. I’ve never migrated a system from an old Mac to a new Mac as easily and quickly as this time, however. I could tell it was hitting the new M1 SoC pretty hard as the Mac mini’s cooling system did come on. Although I wouldn’t have noticed if I hadn’t put my hand behind the enclosure and felt the air coming out. It was moving quite forcefully, but was not hot. It was completely silent, however — no fan noise whatsoever.
Initially, Migration Assistant indicated it would take three plus hours to complete the transfer, which was in line with my past experience. I got up to let it do it’s thing while I did a little Christmas decorating around the house (this was Thanksgiving weekend in the U.S.). About ten minutes later I wandered back into the room where I was setting up the new Mac mini and Migration Assistant now said it would be done in about 20 minutes.
Only 22 minutes left?
What‽ Never have I had a migration go so fast. I wonder how quickly it would have finished if my previous system clone had been on an SSD?
When the Mac mini booted up in macOS 11 Big Sur and I logged into my user account I was immediately overwhelmed with notifications and alerts asking for various system permissions for numerous software programs that launched at startup. I was so used to the old iMac’s startup routine taking ten minutes or more for all my menu bar utilities to load. I was unprepared for how fast this new system loaded everything, seemingly all at once.
It took some sorting out and a little time on my part to get through all these initial setup tasks. I lost count of how many times I entered my Apple ID and password as well as the new admin password for my user — at least I got a head start on impressing it into muscle memory. But after a while things settled down and I moved on to testing old software, installing updates, uninstalling incompatible apps, and installing new software (Adobe Creative Cloud apps, specifically).
Snappiness
There’s that word again. The thing that brought this most pointedly to my attention was opening apps, specifically the Apple apps that have been updated specifically for Big Sur on Apple silicon.
On the old iMac, I kept my music and photos libraries on external drives since the internal storage was only 512 GB. I upgraded the M1 Mac mini at the time of purchase to the 1 TB storage option so I could move my music and photos back on to the internal storage. The process was pretty seamless using Apple’s Music, Books, Podcasts, and TV apps to consolidate their respective media from the external drive back into place on the Mac mini. Moving the Photos library was even simpler — copying the library file from the external drive to the Pictures folder in my user’s Home folder, then double-clicking the library file to launch Photos.
When I first launched Photos I was blow away by the fact that the window opened immediately with all photo thumbnails fully visible before the icon on the dock had finished bouncing once. There was no delay to draw the thumbnails in the window as the individual photos were read from disk. This same almost-instant launch of apps is the new normal for those that are compiled for the M1 or are universal (contain both Intel-native and Apple silicon code). I’ve never experienced anything like it. Ready to launch an app and do some work (or play)? Click the dock icon and BAM, the machine is ready for you to start! No more waiting around for windows to render or files to load —they are just there on screen waiting for you to do something.
Real World Production
After getting licenses transferred and apps updated, I am enjoying a new working environment for my telecommuting graphic design production. The main Adobe Creative Cloud app — the one that manages my account subscription and installs/updates the individual applications (Photoshop, Illustrator, InDeisgn, and the like) — updated itself to an M1-native beta version, which is “snappy” and has so far worked great, except it did not recognize the 2020 versions of creative apps I already had installed, so I could not just tell it to update everything to the 2021 versions and migrate all my user settings and preferences. This I had to do manually.
The creative apps that I use mostly are not yet M1 native, so they run in Apple’s translation environment, Rosetta 2. Apple has done it’s best to make sure that Intel-based applications that are translated with Rosetta 2 work as expected (just as if they were running on an Intel Mac). The Adobe apps are no exception. They are not “snappy”, but they do load faster and perform better than they did on the old Intel iMac I was using. I’d say they launch in about half the time it took on the iMac. So, even though they are not yet optimized for Apple’s silicon, I am experiencing a much more responsive working environment. All the features that I’ve put to the test have worked and I’ve had no unexplained crashes. This is all anecdotal and only over three days of working, but It’s a more enjoyable experience by far.
Moving Forward
There’s still a bunch of tweaking and app updates to go (when developers get M1-native versions out) before I have the new setup where I want it. But for the time being I am very pleased and glad I jumped onto the leading edge of Apple’s Macintosh offerings. Considering these are the first generation Apple silicon Macs, and the slowest of this class we are likely to see as the rest of the Mac line transitions to Apple SoCs, I wouldn’t hesitate recommending to anyone needing a new Mac computer to choose any of the new M1 macs. This is the future of Mac computing, available now!
Sometime in the first couple of months of the 2020 pandemic shelter-at-home period, my wife and I rewatched one of our favorite movie musicals of all time,The Sound of Music. Every time I see it my heart is filled with euphoria at the sweet sound of Julie Andrews’ voice as she masterfully delivers unforgettable song after song. One of those songs, sung to the Von Trapp children on her first night as governess to calm their fears during a late-winter thunderstorm, is titled, “My Favorite Things”.*
Keeping Apps Up to Date
The practice of listing things to be grateful for is a recommendation for dealing with the stress and uncertainty of these times. So I thought I’d take a cue from that song and make a series of blog posts on some of my favorite things related to Apple specifically and technology in general. In this second installment I’d like to share with you my favorite app for helping me keep applications on my Macs up to date.
If you only use the applications provided by Apple with the operating system or only add apps from the Mac App Store, then this may not really apply to you as those get updated automatically by Apple with OS updates and by turning on “Install app updates” in the App Store preference pane in System Preferences.
The App Store preference pane in System Preferences. Check the “Install app updates” box for your Mac App Store purchases/downloads to get updated automatically.
But if you install applications (utilities, games, etc.) from third-party software developers by downloading from websites, you may find that they don’t all have built-in mechanisms for keeping themselves updated to the latest versions. As the old Apple marketing campaign used to say, “There’s an app for that.”
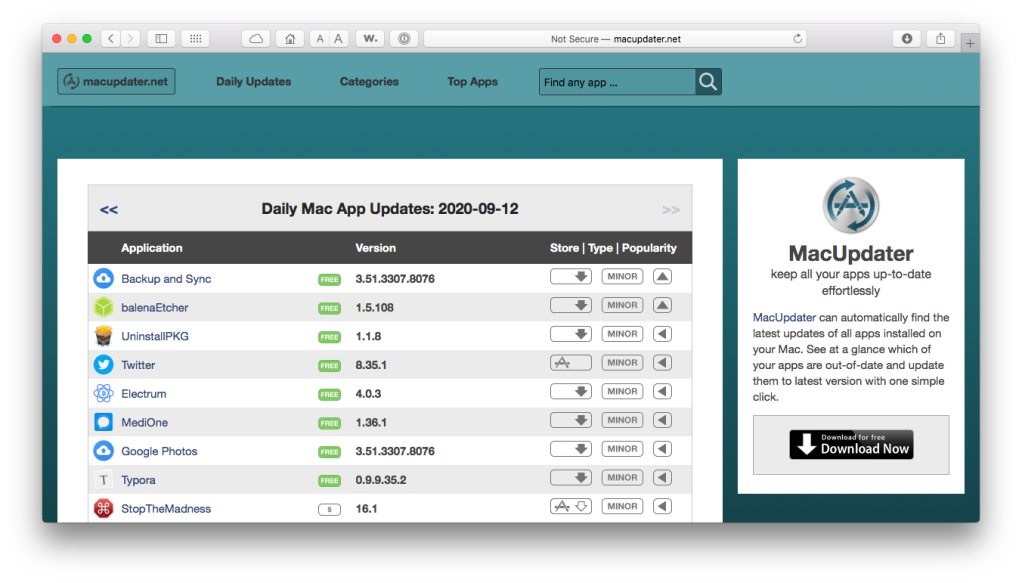
My Favorite is actually a website/app combo from CoreCode called MacUpdater. The website is macupdater.net and it gives you free access to their database of all Mac apps, which provides information on their current versions. You can search for the app’s name that you want to find out if there is an update and use the tools on the website to download the update, either through the Mac App Store or from the developer’s website. But this is still somewhat of a manual operation—there’s a better way.
The MacUpdater.net website.
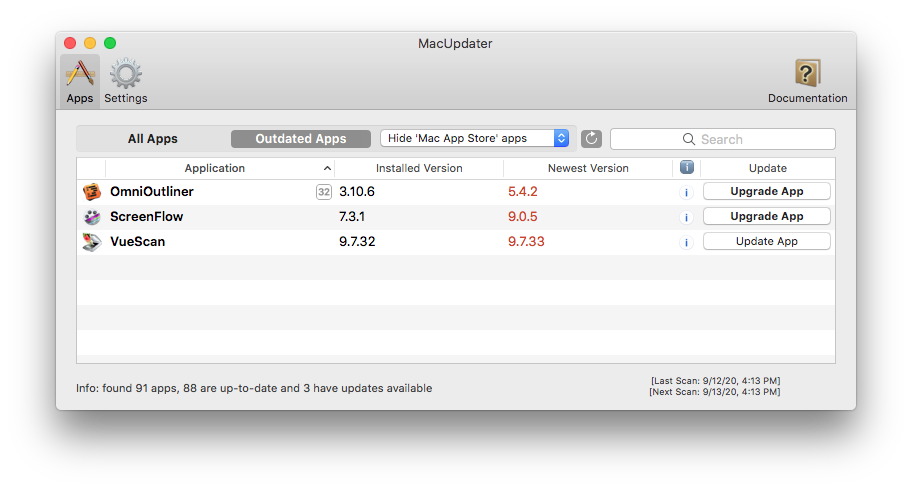
Download their desktop app, appropriately called MacUpdater. It’s also free to download and use. When you run the app, it scans your Mac for all installed applications, calls home (you need an active Internet connection) and compares the versions on your Mac with the latest version in their database, and presents you with a list of apps that have updates/upgrades available. You can tell it to “update all” or click on update buttons for each one in the list manually, whatever works best for your situation. It can even run in the background and automatically update apps when they become available.
The MacUpdater app after a scan.
It doesn’t work with every single app, but when it has a problem updating an app, it will notify you of the issue and usually download the installer and launch it for you so you can proceed with the update/upgrade. It won’t automatically upgrade any apps where there’s an upgrade fee—for those you will still need to deal directly with the software developer for the app in question..
The free version lets you update up to 10 apps on your system. I believe that is per session/scan. You are limited to 4 manual scans every 18 hours (this applies to the full paid version, the limit for the “free” version may be lower). The full version is only $9.99 U.S. (same in €). It’s a one-time purchase and not a subscription. The blurb about it on their website has the infinity symbol next to it, which I assume means it’s a lifetime license—you’ll never have to pay again even when MacUpdater gets updated. You can use it on up to 5 Macs with that one license.
Now, there may be some confusion in that there is another similar website/app service combo called MacUpdate (with no “r” on the end). The website is macupdate.com. They also have a desktop app you can download to scan and update apps on your system. It can be downloaded for free, but I’m not sure of it’s “free” features and/or limitations. I did use it years ago when it was totally free, but when they went to a paid subscription model, I just decided to monitor my app updates manually on my own (until MacUpdater came into my consciousness, thanks to one of my favorite podcasts, MacGeekGab). The MacUpdate app is $20 for six months. This is not the one I’m recommending. But feel free to check it out—you may like it.
*By the way, “My Favorite Things” is not really a Christmas song, even though many musical artists have covered it on their Christmas albums over the past 60+ years. First, in the chronology of the musical, it was sung in late February or early March 1938. Second, the lyrics don’t mention Christmas at all. There are references to mittens, packages, sleigh bells, snowflakes, and winter—all of which could be inferred to be images related to Christmas, but could just as easily not.
Sometime in the first couple of months of the 2020 pandemic shelter-at-home period, my wife and I rewatched one of our favorite movie musicals of all time,The Sound of Music. Every time I see it my heart is filled with euphoria at the sweet sound of Julie Andrews’ voice as she masterfully delivers unforgettable song after song. One of those songs, sung to the Von Trapp children on her first night as governess to calm their fears during a late-winter thunderstorm, is titled, “My Favorite Things”.*
The practice of listing things to be grateful for is a recommendation for dealing with the stress and uncertainty of these times. So I thought I’d take a cue from that song and make a series of blog posts on some of my favorite things related to Apple specifically and technology in general. In this first part, I’d like to share with you three of my favorite podcasts for Apple-related news, tips, and knowledge.
Mac OSKen
Independently produced by Ken Ray, Mac OS Ken is a commute-sized, weekday podcast recapping the previous day’s tech news as it relates to Apple. Ken’s delivery is infused with his unique wit and dry humor, making even the stock market numbers enjoyable and understandable.
Mac Geek Gab
The Mac Observer’s Mac Geek Gab podcast is my go-to listen for tips, geeky information, and new software and gadgets. Co-hosted by Dave Hamilton and John F. Braun, it’s about 90 minutes long and episodes usually drop every Monday.
MacVoices
Chuck Joiner, the host and face of MacVoices, has been involved in the Apple ecosphere for decades and has been a mainstay of my podcast subscription list since I became aware of podcasts. I like MacVoices for the broader community perspective and understanding I receive from his guests. Chuck interviews influential “voices” from all parts of the technology world that orbit around Apple; software developers, hardware inventors, tech journalists, bloggers, other podcast hosts, special event and trade show coordinators, consultants, publishers, etc. MacVoices episodes run about 30 minutes or so and are published regularly, but not on a set schedule.
So, if you have a hankerin’ to learn more about Apple news, want to brush up on geek tips and gadgets, or broaden your understanding of the Apple ecosphere, you can’t go wrong with these three podcasts.
*By the way, “My Favorite Things” is not really a Christmas song, even though many musical artists have covered it on their Christmas albums over the past 60+ years. First, in the chronology of the musical, it was sung in late February or early March 1938. Second, the lyrics don’t mention Christmas at all. There are references to mittens, packages, sleigh bells, snowflakes, and winter—all of which could be inferred to be images related to Christmas, but could just as easily not.
A slide from the WWDC 2020 Keynote showing components of future Mac SoCs.
On June 25, 2020, a good friend of mine, Kathryn Knoll, posed a question on my Facebook wall. I worked for/with her in the mid-’90s at Sophia Center, a spirituality-support center now located in Portland, Oregon.
Kathryn said, “Hey Barry, would you be willing to help those of us who don’t know what an Arm CPU core is. Why should we be excited about it? You always explain it so well and I’m humble enough to say I don’t know anything about it even though all of my devices are Apple products.”
I thought it was a great quesiton. Since I figure a lot of my friends, family, clients, and readers may be asking the same thing, I decided to answer the question in a blog post.
So, Sister Kathryn, let me see if I can do this without getting too geeky. To paraphrase Wikipedia, ARM is a family of architectures for computer processors. ARM stands for Advanced RISC Machine. RISC stands for Reduced Instruction Set Computing. So, there’s an acronym inside an acronym going on here. (Still pretty geeky, eh? Bear with me; just trying to establish a bit of a foundation.)
Again, from Wikipedia: “Arm Holdings is a semiconductor and software design company wholly owned by Japanese conglomerate SoftBank Group and its Vision Fund”. Oddly enough, even though ARM is an acronym, the logo for the company is all lowercase “arm”. They license their CPU core designs to many mobile device manufacturers around the globe, Apple, Inc. being one.
At their 31st annual World Wide Developers Conference (WWDC 2020; link to the keynote) this past week Apple announced the start of transitioning the Mac from Intel-based CPUs to custom-designed “Apple silicon”. They never actually used the term “ARM” in the announcement, however.
Apple has been designing their own “CPUs” for iOS devices for a decade now. The iPhone, iPod touch, and iPad devices have been running on custom-designed Apple silicon since the iPad was introduced in the spring of 2010. But this silicon is actually much more than a simple CPU. They are SoCs, which stands for “systems on a chip”. They license ARM technologies, then design and build custom architectures around them that include GPUs, image signal processors, machine learning and neural engines, to only name a few parts of the overall system (see the slide at the top of this post). Apple contracts with third-party fabricating companies to actually manufacture the SoCs, but they are unique to Apple devices.
That’s where the Mac line of personal computers are going over the next two years. After that, Apple will no longer be tied to Intel’s x86 chip roadmap, but will be able to make Macs on their own schedule. Apple silicon–based Macs will be able to do things no other PC can. Some things we can expect are better performance, lower power requirements (longer battery life on MacBooks), and less heat. The iPad Pro that came out earlier this year outperforms the new MacBook Air (also early 2020) in benchmark tests. In the future, Macs will probably outperform most off-the-shelf PCs from any manufacturer.
Should we be excited? I’m a bit. For most folks, they probably won’t notice when it happens. If you want/need a Mac, buy one. Whether it’s a current Intel-powered Mac or a future Apple silicon–powered Mac (the first one is supposed to ship before the end of this year), it will provide many years of service and performance. Apple is still making Macs with Intel CPUs and will be for at least two years. In the keynote they stated support for Intel Macs will continue for years to come. I imagine that if asked, regular users won’t know or care what kind of processor is in their Mac. Apple has set out a transition path for their hardware and software—and especially their tools for app developers—that will in most cases make the change virtually imperceptible to users.
If you haven’t watched the keynote yet, it is well worth it to get an overview of where the Apple ecosphere is headed.